![]()
CauseF manual (v. 5.0)
Contents
Overview
Default settings - Set default options for all modules
Grid - Key points, Settings window, Grid window
Spheres - Key points, Settings window, Spheres window
Planets - Key points, Settings window, Planets window
Bones - Concept, Process, Key points, Settings window, Bones window, Bones properties window, Presets, Tips and hints
Contact and bug report
Copyright and credits, references, history
Spheres
Key points
Settings window
Spheres window
Key points
You can
- select a number of spheres as a starting point;
- split the spheres into groups, each with its own ID, number of members, and colour;
- place the spheres randomly across the plane, or as a block, or from the centre outwards in spiral fashion;
- while the spheres are moving around the plane, change their speed, the collision force with each other and with the border of the plane;
- apply those to all or particular groups;
- start and stop the movements;
- increase the number of spheres;
- remove spheres;
- switch forces between sphere collision and wall collision;
- switch on sound effects for collisions.
Observe how the inherent potential of each sphere changes when it hits either another sphere or a wall, regardless of its initial state.
And further:
Since the inherent potential of each sphere is subject to change at any moment, it is possible to identify clusters of spheres defined by similar potentials. The clusters emerge because some spheres somewhere on the plane have experienced similar influences due to collision, and that makes their behaviour similar. This can especially be observed in groups that have been defined from the outset, but can occur in any case.
What happens next depends on such spheres' proximity to, either, other spheres with a comparable potential, or spheres that do not share such a potential, in which case the former are bound to change their behaviour. To what extent they will change depends on how often they have a chance to interact with other spheres or the wall.
Since spheres and the wall answer to different force vectors (if so selected), switching the forces between sphere and wall can often change the overall dynamic dramatically. Yet proximity (to other spheres, to the wall) is still important, and so it becomes a matter of probabilities distributed across the entire plane. Proximity can be seen as density, hence the greater the density the more effective the interchange of force vectors.
The effects can best be seen by focusing on the whole picture, rather than concentrating on a single element. Just as looking at an entire ant hill will give a clearer picture of how the ants are reacting, since a single ant here or there is less meaningful.
On the other hand, using two groups, one very small and the other very large in number, it is interesting to observe how changing the (15) Energy factors ... of only one group affects the other.
The behaviour of similar spheres or groups can be compared to a swarm, where its overall dynamic changes gradually due to either imposed factors from the outside or due to self-emerging factors from within. Single members play a relatively trivial role, it's the collective that counts.
Compare the outcomes with different numbers, having 10 spheres for example and then 30. Then, adding another, say, 20 spheres, observe how and where different densities affect the spheres in some area.
![]() Settings window
Settings window
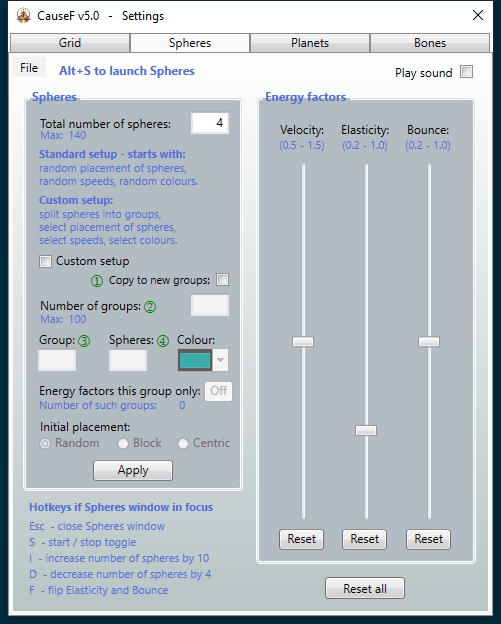
In order of appearance, left to right, top to bottom, by section:
(1) Play sound
If checked, one sound is played when spheres hit each other and another when a sphere hits the wall.
(2) Spheres - Total number of spheres
Set the number of spheres for a Standard setup, that is without groups and special placements at the beginning. Once Spheres is running, more can be added or removed.
(3) Spheres - Custom setup
If checked, spheres can be added in groups, each group defined by its ID, how many members it should have, and the colour of each group. (2) Spheres - Total number of spheres is adjusted as the setup proceeds. Follow the green number guides to ensure
the correct associations.
(4) Spheres - Copy to new groups
Useful if redefining new groups. The previous set is copied to the new one, notwithstanding the new sphere numbers. If there are more groups, the parameters from the last group in the previous set is copied across. If there are less groups, the leftovers are discarded.
(5) Spheres - Number of groups
How many groups the set should contain.
(6) Spheres - Group
The group ID (group #1, #2, etc).
(7) Spheres - Spheres
Sets how many spheres in that particular group. (2) Spheres - Total number of spheres will be updated automatically.
(8) Spheres - Colour
Select the colour for that group.
(9) Spheres - Energy factors this group only
When setting up a group, clicking that button with a certain ID showing in (6) Spheres - Group, any adjustments made under Energy factors while Spheres is running will apply to that group only.
(10) Spheres - Initial placement
How the groups will be positioned at startup.
(11) Spheres - Random
At startup the groups with their members will be randomly distributed across the plane:

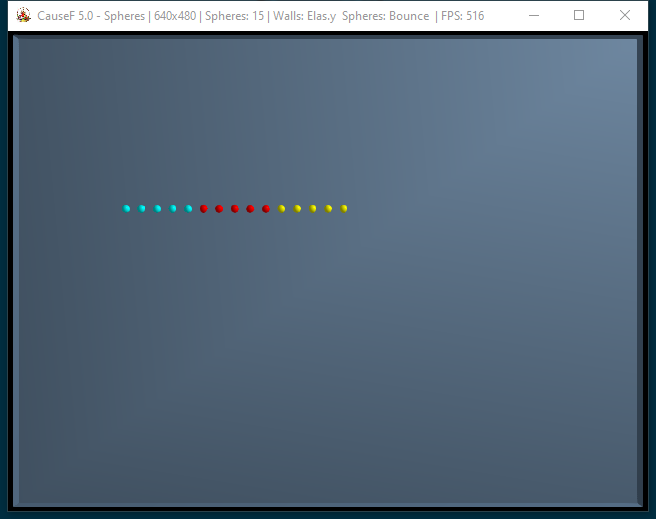
(12) Spheres - Block
At startup the groups with their members will be arraigned in the form of a rectangular block starting in the top-left quarter of the plane:
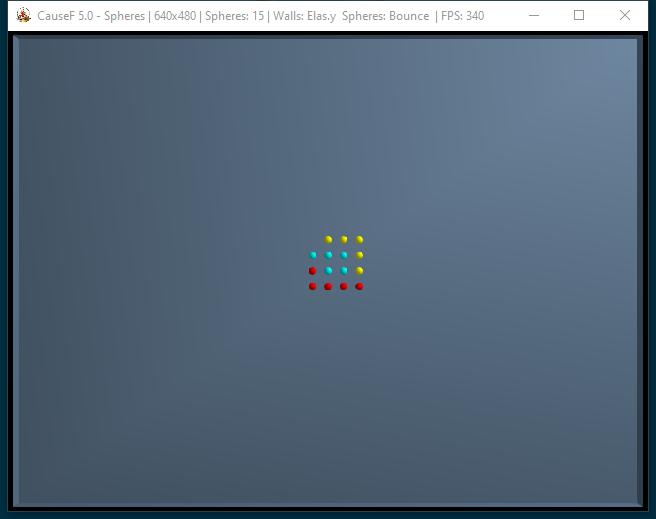
(13) Spheres - Centric
At startup the groups with their members will be placed from the centre outwards in a spiral fashion:
(14) Spheres - Apply
Click this button to transfer the parameters from the Settings to the Spheres window. The Spheres window needs to be closed.
(15) Energy factors - Velocity
Adjust the speed of the spheres, and/or the spheres in a selected group. Can be done while Spheres is running.
(16) Energy factors - Elasticity
Adjust the force vector defining the response to a collision between a sphere and the wall. Either for spheres in general or for the spheres in a selected group. Can be done while Spheres is running.
(17) Energy factors - Bounce
Adjust the force vector defining the response to a collision between a sphere and another sphere. Either for spheres in general or for the spheres in a selected group. Can be done while Spheres is running.
(18) Energy factors - Reset
These buttons reset the respective energy factors to their default values (ie, velocity 1.0, elasticity 0.4, bounce 0.6). Can be done while Spheres is running.
(19) Reset all
With the Spheres window closed, all settings will be reset to their default values.
(20) Hotkeys
Self-explanatory.
![]() Spheres window
Spheres window
Default settings, as per the Settings window above:
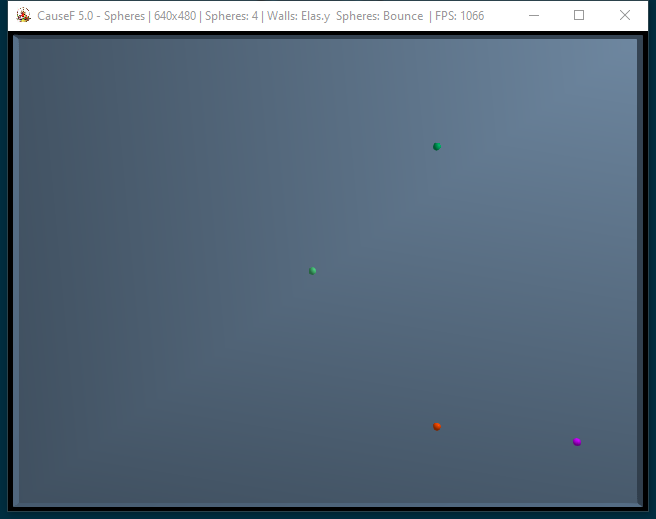
In order of appearance, left to right:
(1) Spheres
The number of spheres currently on the plane.
(2) Walls
Shows the force vector currently applied to a collision between a sphere and a wall. When applying the F hotkey the force vector is switched to the other simultaneously with (3) Spheres.
(3) Spheres
Shows the force vector currently applied to a collision between a sphere and another sphere. When applying the F hotkey the force vector is switched to the other simultaneously with (2) Walls.
(4) FPS
Frame rate per second.
© Martin Wurzinger - see Terms of Use